


When your Mac starts acting up, won’t boot, runs slow, or gets stuck, you don’t need to panic. That’s where macOS Recovery Mode comes in. It’s a built-in recovery system that lets you repair your disk, reinstall macOS, restore from a Time Machine backup, or even use Terminal to troubleshoot deeper problems.
Whether you’re trying to figure out how to start Mac in recovery mode, how to run Mac in recovery mode, or simply looking to reset and wipe everything clean, this powerful toolkit is your first line of defense.
From resolving startup issues to resetting forgotten passwords, macOS Recovery Mode gives you the tools to fix your Mac without visiting a repair shop. Let’s dive in!
What is macOS Recovery Mode and Why Do You Need It
macOS Recovery Mode is a special built-in environment that launches before the main OS. It’s designed as an “emergency toolkit” for your Mac, loading system utilities even if macOS itself won’t start.
In Recovery Mode, you can access Disk Utility to repair drives, open Terminal for advanced fixes, reinstall the operating system, or restore from a Time Machine backup.
This mode is essential when troubleshooting startup problems, preparing a Mac for resale (by wiping all data), or undoing system issues. Think of it as your Mac’s recovery lab – you use it to fix issues ranging from a corrupted disk to a forgotten password, or to restore factory settings when needed.
Why use macOS Recovery: Common reasons include:
- Reinstalling macOS: If your system software is broken or you want a fresh install.
- Repairing Drives: Using Disk Utility to Repair Corrupted Storage Volumes.
- Restoring Backups: Bringing your Mac back to a previous state via Time Machine.
- Erasing Data: Securely wiping your Mac before selling it or transferring ownership.
- Troubleshooting issues: Running diagnostics, resetting passwords, or resetting firmware settings.
All of these tasks are possible from Recovery Mode, making it a versatile tool for any Mac owner.
How to Start Mac in Recovery Mode: A Step-by-Step Guide
Getting into Recovery Mode differs slightly between newer Apple Silicon Macs and older Intel Macs, so follow the steps for your machine:
Apple Silicon (M1, M2, M3) Macs
- Shut Down Completely. Ensure your Mac is turned off (no power).
- Press and Hold Power: Press the power button and keep holding it. You’ll see the “Loading startup options” text appear.
- Select Recovery: When the options appear, click Options > Continue. Authenticate if prompted.
- Access Utilities: After a short wait, you’ll boot into macOS Recovery Mode.
These steps work for any Mac with Apple’s M-series chips. Keep holding the power button until you see the startup options menu – don’t release early or it will boot normally.
Intel-based Macs (Intel Core series)
- Restart Your Mac: Click the Apple menu and choose Restart.
- Hold Command+R: Immediately as it restarts, press and hold the Command (⌘) and R keys together. Keep holding them down.
- Watch for the Recovery Screen: Release the keys when you see the Apple logo or a spinning globe. (The spinning globe means it’s attempting Internet Recovery, usually if the built-in Recovery is unavailable.)
- Enter Recovery: After a short wait, the macOS Utilities (or Recovery) window will appear. You are now in Recovery Mode.
For most Intel-based Macs, simply holding down Command+R during boot will load the latest macOS version that was installed on your Mac. If you encounter a globe icon or it skips recovery, your keys may have been held too late, or the recovery partition may be missing.
Types of Recovery Mode: Local vs. Internet Recovery
There are two flavors of macOS Recovery:
- Local (Built-in) Recovery: This runs from a special recovery partition on your Mac’s drive. It’s accessed with the methods above (Command+R on Intel, or the power button on Apple Silicon). It requires no internet; everything loads from your hard drive.
- Internet Recovery: This version downloads recovery tools from Apple’s servers. It’s used when the local Recovery is unavailable or corrupted. On Intel Macs, hold Option (⌥)+Command+R (or Shift+Option+Command+R) at startup instead. You’ll see a spinning globe and may need to connect to Wi-Fi. Wait until it finishes downloading the necessary components.
On Apple Silicon Macs, there’s no separate Internet Recovery mode. Booting into Recovery on an M-series Mac automatically checks for an internet connection and pulls tools from Apple if needed. In practice, this means that Mac Recovery on M1/M2/M3 will use the internet whenever required, providing the same experience as local Recovery.
Key Differences: Local Recovery boots from your Mac’s internal image and is usually faster. Internet Recovery downloads the latest Apple tools online, which can be useful if your Recovery partition is damaged. Use Internet Recovery (globally by the globe icon) when local Recovery won’t start.
How to Run Mac in Recovery Mode: Quick Tips for Accessing the Feature
If you’re having trouble entering Recovery Mode, these quick tips can help:
- Press Keys Immediately: Start holding Command+R (or Option+Command+R for Internet Recovery) right when you hear the startup sound or see the power on. Waiting too long can cause the Mac to boot normally.
- Use an External Keyboard: If your Mac’s built-in keyboard is glitchy, try a wired external keyboard. A faulty key press can prevent entry.
- Check Key Combinations: Make sure you’re using the correct combo. On Intel Macs, Command+R for the latest compatible macOS. Option+Command+R for online recovery (spinning globe). On new Macs, holding the power button is enough.
- Try Again: If it fails, reboot and try again. Timing is essential.
- If Recovery Won’t Load: Your Recovery partition may be corrupted. In that case, use Internet Recovery (Option+Command+R).
- Reset NVRAM (Intel Macs): Some users find holding Command+Option+P+R for 20 seconds (right after powering on) can fix unresponsive recovery boots. (This resets a few low-level settings.)
By following these tips, you should be able to boot any Mac into Recovery Mode even if the first attempt doesn’t work.
macOS Recovery Mode Interface: What You Need to Know
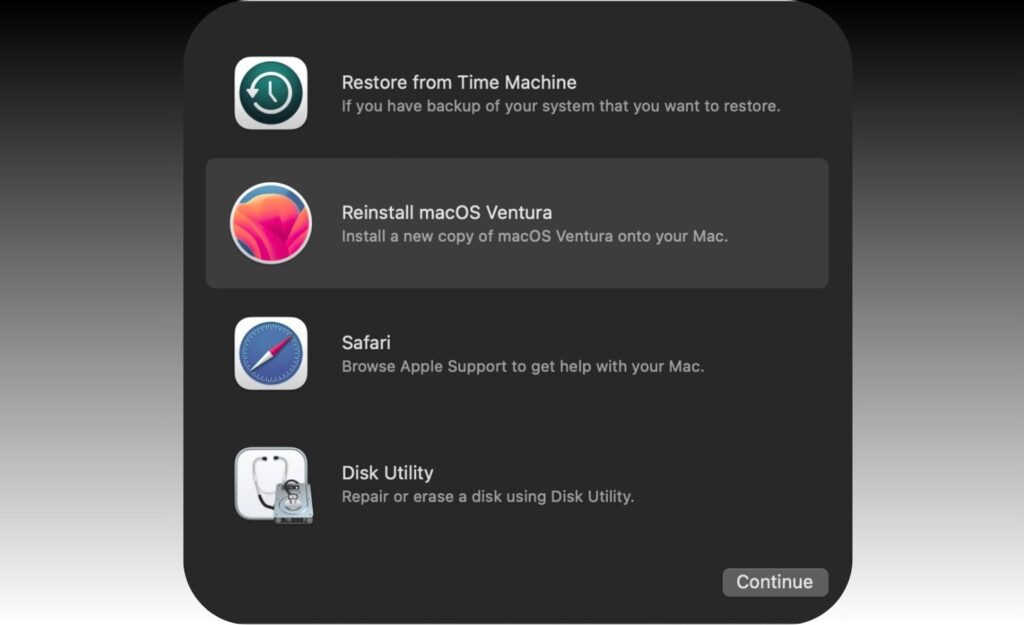
Once in Recovery Mode, you’ll see the macOS Utilities (or macOS Recovery) window with several key options. Here’s what you’ll find:
- Disk Utility: Use this to verify or repair your Mac’s hard drive or SSD. You can run First Aid on a volume to fix errors. This is often the first step if your Mac won’t boot or has disk problems.
- Reinstall macOS: Lets you reinstall a fresh copy of macOS. It downloads the OS version that matches your Recovery (latest installed, internet, or original) and reinstalls it on your disk. No data is usually lost, but having a backup is always wise.
- Restore from Time Machine Backup: If you have a Time Machine backup, this will restore your entire system to a previous state. It’s useful if a recent change broke your Mac and you want to revert.
- Get Help Online (Safari): Opens a limited Safari browser for browsing Apple’s support site and other web resources. (On newer versions, this is simply “Safari,” on older macOS it was “Get Help Online.”) Note extensions are disabled, and it’s mainly for troubleshooting guidance.
- Utilities Menu (top bar): At the top of the screen, you’ll see a Utilities menu. This gives you access to:
- Terminal: Open a command-line prompt for advanced troubleshooting (explained below).
- Startup Security Utility: On Macs with a T2 chip or Apple silicon, this lets you enable “Allow booting from external media.” You need this turned on to boot from USB drives.
- Network Utility: Tests and displays network information (such as ping) for network diagnostics.
- Recovery Assistant/Startup Disk: (Depending on macOS version) You may also see options to select a startup disk or migrate data.
In summary, the Recovery interface is a menu of tools for repair and recovery. You choose the appropriate utility for your task.
For example, to fix a disk, you’d choose Disk Utility; to refresh the OS, you’d pick Reinstall macOS. Familiarize yourself with these options so you know where to click when you enter Recovery Mode.
Also Read: How to Track From IP Address: Simple Steps Anyone Can Follow
Using Terminal in macOS Recovery Mode for Advanced Troubleshooting
For more advanced control, Recovery Mode includes the Terminal app. To open it, click Utilities in the menu bar and select Terminal. A terminal window lets you run command-line tools directly on your system volumes. You might use this to reset passwords (resetpassword), manipulate disks (diskutil commands), or kill stubborn processes. For example, the resetpassword command in Recovery can help if you forgot a user password.
However, use Terminal with extreme caution. Recovery Terminal is powerful and unrestricted, so mistyping a command can delete files or even the OS. As the saying goes, it’s “unforgiving.”
You should only run commands here if you’re confident in what they do. Always double-check any command before pressing Enter. In expert hands, Recovery Terminal is invaluable; for novices, it’s best to stick with the graphical tools unless guided by a trusted source.
How to Create a Bootable USB Installer from Recovery Mode

Creating a bootable USB installer can save you when Recovery Mode itself isn’t enough. Here’s how to do it from Recovery Mode:
Prepare the USB Drive: Insert a USB flash drive (16GB or larger). Open Disk Utility (in Recovery) and select the USB. Click Erase and format it as GUID Partition Map with Mac OS Extended (Journaled) (for older macOS versions) or APFS (for newer macOS versions). In either case, ensure the Scheme is GUID, as this allows booting. Give it a recognizable name (e.g. “MyUSB”).
Enable External Boot (if needed): On an Intel Mac with a T2 chip or on Apple Silicon, you must allow booting from external drives. In the Utilities menu, open the Startup Security Utility and ensure that “Allow booting from external or removable media” is enabled. Without this, your Mac may refuse to boot from the USB.
sudo /Applications/Install\ macOS\ Ventura.app/Contents/Resources/createinstallmedia --volume /Volumes/MyUSB
Press Enter. You may need to adjust the path if your installer app has a different name (e.g. Catalina, Monterey, etc.). This command uses Apple’s built-in createinstallmedia tool (introduced in OS X Mavericks) to copy the macOS installer onto the USB.
Wait and Confirm: The Terminal will erase the USB and copy files – this can take several minutes. Do not eject the USB or shut down during this process. When it finishes, you’ll have a bootable macOS installer.
Now you can shut down or restart your Mac and hold the Option key on boot. Select the USB installer to start up from it. From there, you can install macOS or access tools even if your internal Recovery is unavailable.
Accessing Network Utility in Recovery Mode for Network Diagnostics
Recovery Mode also provides basic network troubleshooting via Network Utility. From the Utilities menu, select Network Utility. This tool shows your network interfaces and lets you run tests like Ping or Traceroute.
For instance, you can ping a server (like 8.8.8.8 or your router) to confirm Internet access. This is particularly useful if you’re using Internet Recovery and need to verify your Wi-Fi connection, or if you suspect network issues. Network Utility isn’t a full browser, but it’s handy to check connectivity without booting into macOS first.
Resetting the System Management Controller (SMC) from Recovery Mode
Note: Resetting the SMC (System Management Controller) isn’t actually done within Recovery Mode, but it’s a related troubleshooting step. The SMC controls hardware functions (power, cooling, battery, etc.) on Intel Macs. If you suspect a hardware glitch, reset it as follows (while the Mac is off):
- For most Intel laptops with a T2 chip, shut down, then hold Shift + Control + Option + Power for 10 seconds. Release and press the power again to boost.
- For desktops (iMac/Mac mini) with a T2 chip, unplug the power for 15 seconds, plug back in, wait 5 seconds, then turn on.
- For older Intel Macs (no T2), the reset is the same combo (Shift+Control+Option+Power).
- Apple Silicon Macs: There is no separate SMC reset – simply shutting down and turning back on performs an equivalent reset.
Always do an SMC reset while completely shut down, not from within macOS or Recovery. It’s a way to clear low-level issues before attempting software recovery.
Common Issues You Can Fix with macOS Recovery Mode
macOS Recovery Mode is designed to handle a variety of common Mac problems. Here are a few scenarios where Recovery Mode comes to the rescue:
- Startup Failures: If your Mac can’t boot into the normal system (blank screen, freezing during boot, etc.), you can use Recovery to repair or replace the OS. You might run Disk Utility to fix a corrupted volume or Reinstall macOS to refresh the system files.
- Disk Problems: Drive errors (unexpected shutdowns, disk unreadable) can often be fixed by running First Aid in Disk Utility. Recovery Mode lets you run these fixes without the OS active.
- Lost Data / Backups: Accidentally deleted files or a corrupt macOS may lead you to restore from a Time Machine backup. Recovery provides a quick way to select a backup and recover your entire system.
- Changing macOS Versions: You can use combinations (like Option+Command+R) to install a newer or older compatible macOS. This is handy if you need to upgrade for security fixes or downgrade to older software.
- Selling or Resetting Mac: To erase all personal data and settings before handing off your Mac, boot into Recovery and choose Disk Utility to erase the drive, or use Reinstall macOS to erase/replace it. This wipes your Apple ID and files from the machine.
- Firmware Password and Security: From Recovery, you can set or remove a firmware password (for older Mac models) via Startup Security Utility. If someone forgets their login, you can reset it using Terminal’s
resetpasswordtool (for filevault/encrypted drives). - Advanced Troubleshooting: Using Terminal, you can run diagnostic commands or scripts that aren’t available in the regular OS. For instance, network or file system commands to pinpoint issues.
- Network Issues: If you suspect your internet/Wi-Fi is down, use Network Utility to test connections. This can help when trying Internet Recovery or downloading updates.
In short, macOS Recovery Mode addresses nearly any system-level trouble. Apple built it to be the Swiss Army knife for Mac repair, so take advantage of it when facing problems.
Best Practices for Using Recovery Mode to Maintain Your Mac
Using Recovery Mode wisely helps maintain your Mac’s health:
- Always Back Up First: Before tinkering in Recovery Mode, make sure your data is backed up (Time Machine, iCloud, or external disk). Many Recovery tools (like Disk Utility, first-aid, or OS reinstall) can potentially lead to data loss if something goes wrong. Regular backups are your safety net.
- Use a Stable Power Source: If you’re on a laptop, keep it plugged into power while performing recovery tasks. Interrupting a reinstall or restore due to power loss can corrupt the system.
- Check Startup Security Settings: On T2/Apple Silicon Macs, verify in Startup Security Utility that external booting is allowed if you plan to use bootable installers. This avoids confusing errors when trying to start from USB drives.
- Keep the Recovery Partition Intact: Don’t delete or modify the Recovery partition unless you know what you’re doing. It’s best left alone by normal users. macOS updates will keep it current automatically.
- Use Official Utilities: Stick to the built-in tools (such as Disk Utility and Time Machine) rather than third-party ones, unless absolutely necessary. Apple’s utilities are designed for the Recovery environment.
- Exit Properly: When done, exit Recovery Mode by choosing Apple menu > Restart (or Shut Down). This ensures your Mac boots back into the normal system environment safely.
- Regular Maintenance: Even outside of dire situations, periodically run Disk Utility’s First Aid on your drives and keep your system clean of clutter and malware. The less often you need Recovery, the healthier your Mac will be in general.
By treating Recovery Mode as a standard part of your Mac toolkit backing up before use, following official instructions, and taking precautions—you’ll make the most of its power without risk.
One Thought on Mastering macOS Recovery Mode
Mastering Recovery Mode gives you the confidence to handle nearly any Mac problem. Whether you’re fixing a stubborn startup issue, updating or reinstalling the OS, or just erasing your Mac securely, Recovery Mode has the tools you need.
Remember to back up regularly, keep your system updated, and don’t hesitate to use these built-in utilities when trouble strikes. With practice, entering and using macOS Recovery Mode will become second nature, ensuring your Mac stays healthy, performant, and ready for anything.
FAQs
It’s a built-in macOS environment for system repair, OS reinstallation, disk fixes, and backups. It helps resolve major issues when your Mac won’t boot.
On Intel Macs, restart and hold Command + R.
On Apple Silicon, shut down, then hold the power button until “Options” appears.
Local Recovery loads from your Mac’s disk; Internet Recovery downloads tools from Apple’s servers. Use the Internet if the local partition is damaged or missing.
Yes. Open it via Utilities > Terminal in Recovery Mode.
You can reset passwords, run diagnostics, or manage disks, but be cautious.
Use Disk Utility to erase the USB, then run the createinstallmedia command in Terminal. Make sure Startup Security allows booting from external media.
Also Read: